How To Display HTML CSS or JavaScript Code In Blogger Posts
-
Tuesday, 29 September 2015
If you want to show HTML, CSS, JavaScript, or PHP Codes with Syntax Highlighter in your blogger posts with some beautiful styles, tables & with your logo then the problem is solved because i'm going to show you how can you do this easily and fast on your blog. Actually it's original name is (Code Highlighter) or you can call (Syntax Highlighter). Sometime people want to insert HTML, CSS code directly into blogger post but they get an error message that you can't do this in HTML post editor. But don't you worry everything is possible here.
9: It's work only in normal (Compose) area don't change to HTML editor in blogger posts.
How To Insert CSS, JavaScript, HTML Codes In Blogger Posts? it's the most common question asked by blog owners especially when they're working on codes or running tech site to showing widgets codes in blogger posts.
So today i will show you how to do with some easy steps and make your codes more stylish in box,
In short as you know i love to share unique & long information with short tricks. I hate to waste your or mine time here so let's get to the point,
I know you love to see Demo so i'm going to show here below,
Follow my steps,
1: Go To Blogger
2: Select Your Blog
3: Click Templates
4: Select (Edit HTML)
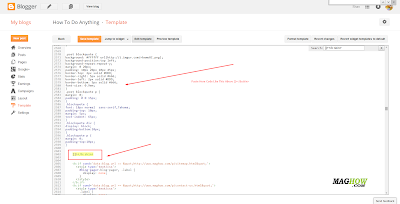
5: Click Anywhere In HTML Just Press CTRL + F & Find ]]></b:skin> Code Like Below In Example Picture
6: Past Below Code Above ]]></b:skin> Just Like In Example Picture Below,
Code:
7: Now Go To Posts
I know you love to see Demo so i'm going to show here below,
Follow my steps,
1: Go To Blogger
2: Select Your Blog
3: Click Templates
 |
| Picture Help / Example |
4: Select (Edit HTML)
 |
| Picture Help / Example |
5: Click Anywhere In HTML Just Press CTRL + F & Find ]]></b:skin> Code Like Below In Example Picture
 |
| Picture Help / Example |
6: Past Below Code Above ]]></b:skin> Just Like In Example Picture Below,
Code:
.post blockquote {
background: #C8EFFF url(https://blogger.googleusercontent.com/img/b/R29vZ2xl/AVvXsEgDfKS-rvYGVBdECuLY9dkZyu7lLdb6EQoVDNamy01u-ZBH1_H5P-caMqz67YlRG29Oj9CtYJUAArT6J1ILmUmghEs1Pt2-f_rhkvqFrLHSBtK416V8n4ne7s7_uL7kGoZQaXuL0AEde4A/h120/Copyright+Logo+For+HTMl+Code+Highlighter.png);
background-position:top left;
background-repeat:repeat-y;
margin: 0 20px;
padding: 10px 20px 10px 45px;
border-top: 2px solid #DDD;
border-right: 5px solid #666;
border-left: 2px solid #DDD;
border-bottom: 5px solid #666;
font-size: 0.9em;
}
.post blockquote p {
margin: 0;
padding: 0 0 15px;
}
.blockquote {
font: 18px normal sans-serif,Tahoma;
padding-top: 10px;
margin: 5px;
text-indent: 65px;
}
.blockquote div {
display: block;
padding-bottom:10px;
}
.blockquote p {
margin: 0;
padding-top:10px;
}
 |
| Picture Help / Example |
7: Now Go To Posts
 |
| Picture Help / Example |
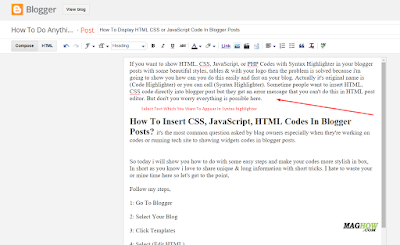
8: Select Any Text You Want To Show In Stylish Box & Click (Quote) Button Like Below In Picture.
 |
| Picture Help / Example |
9: It's work only in normal (Compose) area don't change to HTML editor in blogger posts.
Customization
10: Change Yellow Highlight URL From Step 6 With Your Own (c) Copyright Image,
Note: If you don't want to show image just remove URL and keep it simple without image.
11: Change Red Highlight Color From 6 Step Code & It's Background Color Select Your Favorite Color.
Note: I will recommend you to keep it white color like it's in demo version.
Leave comments for suggestions/feedback or If you are facing any problem just let me know so that I could help. Stay tuned for upcoming posts like this. Peace and blessings :)


